


![]()
While building my models, I occasionally develop a building technique that I find useful. Or a detailing technique that adds some extra realism to the motorcycle.

I hope you find something that will make your model building easier or improve your model's detailing.
![]()
![]()
Tip of the month
Cutting Custom Shapes from Sheet Styrene or Brass
Occasionally you might want to make customs parts by cutting them from sheet
styrene or brass. Drawing the shapes you need on the styrene or brass can be
very difficult. Here is how I do it:
- Use a CAD (Computer Aided Design) or drawing program to draw the shape you need. Draw it in the size you need on the model.
- Print the shape onto a self-adhesive address label.
- Or print the shape on to regular paper. Then apply Microscale Aluminium Foil Adhesive to the back or the paper.
- Apply the address label or paper to the styrene or brass.
- Cut and bend into shape.
- Remove pattern.
Some shapes you need can be quite complex, and printing to paper also gives you a test pattern to cut, bend, and apply to the model to see if everything is okay before cutting your styrene or brass
![]()
![]()
Tamiya Tech Tips
Recently Tamiya has started revealing modelling Tech Tips that they use
when assembling their models.
![]()
![]()
How do I assemble my motorcycle kits?
I've been asked on several occasions on my what my assembly sequence is for
building motorcycles. Here is a overview of how I approach it.
| Step | Description |
| Preparation | 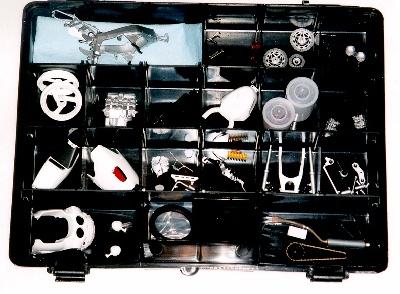 I start by
removing and cleaning up ALL the parts in advance and sort them by what colour they are to
be painted. Luckily Tamiya places locator pins such that similar parts will only fit one
way. If I'm not sure, I stick the part to a piece of masking tape with its part number.
I use a small parts organizer to store my cleaned up parts. I start by
removing and cleaning up ALL the parts in advance and sort them by what colour they are to
be painted. Luckily Tamiya places locator pins such that similar parts will only fit one
way. If I'm not sure, I stick the part to a piece of masking tape with its part number.
I use a small parts organizer to store my cleaned up parts.
Remove parts from the sprues using clippers or with a knife with the part supported from underneath. Cleanup the mould lines and any flash by lightly scraping a #11 blade along the mould line. You might even need to resort for using needle files on a properly moulded kit. Be careful not to gouge the part. If needed, use 600 or 1000 grit wet/dry sandpaper to smooth the parts. |
| Detailing (see image map above) |
Although 1:12 & 1:6 motorcycle kits can be very detailed when compared to other type of kits there is room to add extra detail. For example, the 1:12 Tamiya Honda CX500 Turbo has ~120 parts and the 1:6 Tamiya Honda CX500 Turbo has ~370 parts. Now is the time to modify parts and add make extra detail parts. With the Internet, there is a wealth of reference material at your disposal. Leaving any wiring detail until finally assembly. |
| Painting | With all the parts cleaned up I assemble any parts that will be painted the same
colour.
With bikes and autos, that means precious little can be assembled.
Stop! Before you paint anything you should wash the parts in luke warm water with a couple drops of dishwashing soap. This will remove release agent, finger oils and dust. Dry with a lint free cloth and then let air dry overnight to be sure the everything is completely dry. I try to prime and paint the bodywork first. The I paint the remaining parts in one or two sittings. Since I have the part sorted by colour, I do each set all at once. I start with the lightest colour and go to the darkest. With metallics being the last. This means I don't have to be quite so thorough cleaning the airbrush between colours. Oh, sometimes I put a dab of liquid mask (Maskol) on surfaces that will be cemented. When the paint is dry, just remove the mask and cement the part. This helps keep scraping off paint from parts to a minimum. |
| Decals | I know some modellers that love decalling, but this is the part of modelling I still dread the most. Especially on models with complex markings like racing motorcycles. The main thing to remember when decalling is to take to your time. If you rush, you're asking for trouble. |
| Assembly | Now you can just sit down and start assembling at 'Step 1' and breeze right through. Be sure to add any wiring details when its the easiest to do. With everything prepped and painted its amazing to see the motorcycle come together in just a few hours. |
![]()
![]()
Would you like to submit a modelling tip?
If so, just please email it to khartlen@interlog.com and I'll add it to my
pages with appropriate credit and your email address in case a modeller would like more
information from you.
|
|||||||||||||||
 Home - News - Tips - Gallery - Workshop - Kits - Links - What's New? - Site Index |