

![]()
Painting
![]()
Air compressor
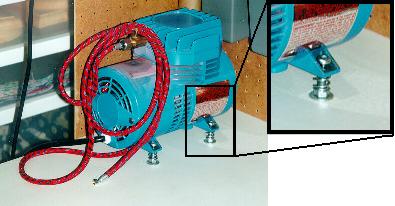
The air supply for the airbrush. I have the compressor (Paasche D500) mounted to the
workbench with four bolts and the compressor sits on four compression springs. This keeps
the compressor from moving around and isolates the vibration from the workbench. The
compressor does not have an integral on/off switch so I use a switched
power bar.

Note: oil-less diaphragm compressors tend to pulsate and run constantly. This means they heat-up quickly and
must be turned off every 20-30 minutes to cool down. Letting the
compressor cool off will greatly extend it's life.
As soon as the humidity approaches 55% you risk getting water drops in your air source. Higher that 55%, and its almost guaranteed.
I bought one of those weather stations so I can check indoor humidity. I also
have a Paasche in-line moisture trap in my air hose. Its made of aluminium and will probably last a lifetime. I
also have a de-humidifier set to keep the humidity around 50% or lower. Indoor humidity should be in the 30-50% range even if
you're not a modeller wanting to airbrush.
![]()
Airbrush
 |
|
Paasche VL |
 |
|
Paasche VSR90 |
An airbrush gives an even and consistent coat of paint that is virtually impossible to duplication with a brush. Brush painting is only done to highlight details on a part already painted in a base colour using the airbrush.
I have two double-action airbrushes. A Paasche VL when painting larger parts like body work, etc. and a VSR90 for detail painting. The VSR90 is terrific for detail painting. I was able to freehand airbrush the tires, turn signal housings, muffler & airbox and other parts of a bike with minimal over spray. Paasche said spraying 1/64" wide lines was possible and they weren't kidding. I used Tamiya's acrylics and they sprayed beautifully. Well worth the money.
For more info on the airbrushes, visit the Paasche web site. And here for my airbrushing tips.
![]()
Carbon-dioxide Tanks (CO2)
Some modellers and artists use CO2 tanks as an alternative to compressors. The
two main reasons are no noise and no worries about moisture.
![]() These can be very
dangerous if not handled properly and the decision to go with a CO2 setup should not be
taken lightly. Read the safety information at http://www.airsmith.com/transofCO2.htm
before you choose between a hobby compressor and a CO2 tank.
These can be very
dangerous if not handled properly and the decision to go with a CO2 setup should not be
taken lightly. Read the safety information at http://www.airsmith.com/transofCO2.htm
before you choose between a hobby compressor and a CO2 tank.
![]()
Masking Fluid
I've started to use Humbrol's Maskol for various masking jobs. Very handy when
small irregular areas on engines, etc. must be masked. It dries to a
rubber like surface
and if you have trouble removing it, use masking tape to grip it and it will come right
off.
![]()
Masking Tape
Needed when painting multi coloured bodywork, masking windshields, etc. Choose
your tape carefully as some can be too strong and others too weak. At the moment I'm most
satisfied with Tamiya's masking tape.
![]()
Stripping Chrome Plating
To remove the chrome plating from parts, I use Easy-Off (tm) oven cleaner. I use
odor free product in the blue spray can. I place the parts in a
desposeable aluminum foil
baking pan, soak with Easy-Off(tm) and cover the pan with aluminum foil. Results vary from
manufacture to manufacturer, but it usually only takes 15-30mins to work. I then wash the
parts clean using an old toothbrush. You may need to repeat the process.
![]() Wear chemical
resistant gloves when handling parts covered in Easy-Off(tm)
Wear chemical
resistant gloves when handling parts covered in Easy-Off(tm)
![]()
Stripping Paint
For whatever reason, sooner or later you'll end up with a coat of paint that is
less than perfect. To quickly remove the paint simply use Easy-Off (tm) oven cleaner. I
use odor free product in the blue spray can. This softened the Tamiya acrylic on one model
that it simply washed off under running water. And, with an old toothbrush, I
scrubbed off
the Floquil paint I used as a primer. I hadn't tried it on other types of paints like
enamels or lacquers.
![]() Wear chemical
resistant gloves when handling parts covered in Easy-Off(tm)
Wear chemical
resistant gloves when handling parts covered in Easy-Off(tm)
|
|
|||||||||||||||
|
|||||||||||||||
 Home - News - Tips - Gallery - Workshop - Kits - Links - What's New? Site Index> |