|
GERMINATING RAINFOREST SEEDS
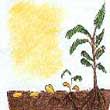
Planting of Seed The
temperature in the Rainforest may differ then that in your home or locale,
the most important part of the first few days of growth depend on it's
environment. An easy and recyclable way to get Rainforest Seed started
is to create your own miniature rainforest using clear plastic softdrink
containers. By cutting the plastic bottle in half and resealing it you
can create your own mini -biodome. When your seedling reaches maximum height
for the container a transplant will be in need. By choosing a bigger pot,
you will determine the size of the species. It is always wise to get a
pot one size bigger than the last to avoid stretching and limping of the
species. Do not use soil from your garden; prefer to treat your seedlings
with garden centre soil. Make sure it is loose and porous, and contain
much organic matter, (fish food works wonders). Cover seed to a depth of
no more than 3 time it's thickness, though fine seed should be barely covered.
In the case of flat seed plant edge wise, winged seed species wings upwards
or removed. Rainforest seeds like warmth, 75-80 degrees (20-30 C) when
starting, this can be accomplished by lighting or placing in a sunny exposure
especially with the biodome process which will help retain needed moisture.
Although many species will germinate in 2-3 weeks some species, particularly
palms can take many weeks and even months. Those attempting to grow palms
should be diligent. The
temperature in the Rainforest may differ then that in your home or locale,
the most important part of the first few days of growth depend on it's
environment. An easy and recyclable way to get Rainforest Seed started
is to create your own miniature rainforest using clear plastic softdrink
containers. By cutting the plastic bottle in half and resealing it you
can create your own mini -biodome. When your seedling reaches maximum height
for the container a transplant will be in need. By choosing a bigger pot,
you will determine the size of the species. It is always wise to get a
pot one size bigger than the last to avoid stretching and limping of the
species. Do not use soil from your garden; prefer to treat your seedlings
with garden centre soil. Make sure it is loose and porous, and contain
much organic matter, (fish food works wonders). Cover seed to a depth of
no more than 3 time it's thickness, though fine seed should be barely covered.
In the case of flat seed plant edge wise, winged seed species wings upwards
or removed. Rainforest seeds like warmth, 75-80 degrees (20-30 C) when
starting, this can be accomplished by lighting or placing in a sunny exposure
especially with the biodome process which will help retain needed moisture.
Although many species will germinate in 2-3 weeks some species, particularly
palms can take many weeks and even months. Those attempting to grow palms
should be diligent.
Exposure to light sources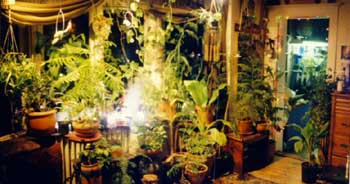 Remembering
that many species grow in the shade of the tropical sun provided by their
taller relatives, it is wise to bear in mind the indirect lighting approach
when positioning your grown plants. Various light fixtures are available
from hardware stores and hydroponic locations that provide adequate indoor
light source for most Rainforest seed. Air circulation and a humidifier
in the room to provide moisture are also beneficial though a nice misting
once a week will help keep your indoor jungle growing. Palms and ferns
are a few of the species that live well in indoor lowlight conditions.
Ordinary light bulbs don't emit enough red and orange light spectrum, however
special plant growing bulbs are available that fit in your average light
socket. These should be placed close to the plant (3ft, 0.9m) and kept
on for 8-12 hours a day. Fluorescent tube lighting is a much more effective
way especially for species that flower, A grolux wide spectrum tube from
Sylvania will cost about $7.00 while the fixture may run you about $20.00.
Directions for proper use are written on the tube light box. We have also
experimented with indoor white spotlights and have found them to be an
adequate heat source and in combination with a wide spectrum bulb can do
wonders, provided that you mist the plants on a more periodic schedule. Remembering
that many species grow in the shade of the tropical sun provided by their
taller relatives, it is wise to bear in mind the indirect lighting approach
when positioning your grown plants. Various light fixtures are available
from hardware stores and hydroponic locations that provide adequate indoor
light source for most Rainforest seed. Air circulation and a humidifier
in the room to provide moisture are also beneficial though a nice misting
once a week will help keep your indoor jungle growing. Palms and ferns
are a few of the species that live well in indoor lowlight conditions.
Ordinary light bulbs don't emit enough red and orange light spectrum, however
special plant growing bulbs are available that fit in your average light
socket. These should be placed close to the plant (3ft, 0.9m) and kept
on for 8-12 hours a day. Fluorescent tube lighting is a much more effective
way especially for species that flower, A grolux wide spectrum tube from
Sylvania will cost about $7.00 while the fixture may run you about $20.00.
Directions for proper use are written on the tube light box. We have also
experimented with indoor white spotlights and have found them to be an
adequate heat source and in combination with a wide spectrum bulb can do
wonders, provided that you mist the plants on a more periodic schedule.
Fertilizing Most of the species of Rainforest seed do well with a fertilizing mixture, consisting of potassium sulfate, also known as potash, to help with the formation of flower and fruit. Super phosphates for quick dissolving plant food, chalk for alkalinity and a balancing of the soil. Coarse sand will help drain and aerate the soil, while peat will hold water, and loam or soil will provide high organic compost. Certain species such as Palm trees should be grown in a soil based compost with very good drainage and lots of fertilizer, (4 parts soil, 1 part peat, 2 parts coarse sand and 3 parts leaf mould). Once
your rainforest seed have reached substantial growth and a change of pot
and compost has taken place, you may simply topdress the soil, on a bi-monthly
basis. In the jungle several layers of dead leaves and compost continually
cover the ground adding important vitamins to the topsoil, as far as an
indoor rainforest goes, the diligent gardener will get the best results
by making sure the same applications of composting and nutritionalizing
to the soil applies.
Plant pestsDuring the course of growing your seeds into mature plants you might encounter a few of the following pests that if not dealt with immediately will kill the plant and continue to spread and destroy your indoor rainforest. We strongly believe in non-chemical pesticides, such as cayenne pepper and soap spray. However, the following pesticides containing these ingredients work permethrin, pyrethrum, derris, and malathion. Depending on the severity of the infestation, we suggest a repeated process of sprays over the coarse of a few weeks to contain the problem. One important note: It is best to dilute the spray in degrees of intensity, making each next spraying a little stronger than the last. We have noticed that certain pests build up immunity to some products. Though one successful spraying may take care of the adult pest, the larvae may be immune to the same dosage the second time around.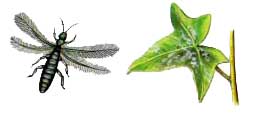 Thrips
- Thrips are commonly found causing damage to flowering plants nestling
in amongst the petals and discoloring the leaves. Look for tiny long black
insects that are apparent around the flowers. Thrips
- Thrips are commonly found causing damage to flowering plants nestling
in amongst the petals and discoloring the leaves. Look for tiny long black
insects that are apparent around the flowers.
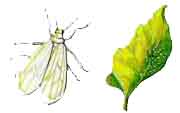 Whitefly
- You can spot white fly as you disturb the leaf. They usually like to
cling to the bottom of the leaf and a shaking of the plant will cause them
to fly. They are a huge problem to control and must be dealt with immediately.
Commit yourself to a long battle that must be concerted over 6 weeks. With
concentrated effort you will eventually eradicate the problem. Remove any
infected plant out of reach of the others, as these whiteflys tend to wander. Whitefly
- You can spot white fly as you disturb the leaf. They usually like to
cling to the bottom of the leaf and a shaking of the plant will cause them
to fly. They are a huge problem to control and must be dealt with immediately.
Commit yourself to a long battle that must be concerted over 6 weeks. With
concentrated effort you will eventually eradicate the problem. Remove any
infected plant out of reach of the others, as these whiteflys tend to wander.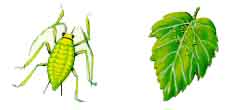 Aphids - Aphids breed prolifically and hundreds can appear over night. Once they multiply they can cause damage very quickly. They attack the new leaf stems and literally suck out the plant juices. Aphids also excrete a sticky substance known as honeydew, which drops down on the lower leaves leaving a sugary deposit that will eventually turn into a fungus. Tiny white long white "eggs " which look insignificant can be very destructive as they float on the slightest shaking or movement of the plant onto another unaffected plant. 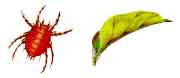 Red spider mite - Probably one of the most difficult insects to actually see on your plant, and very tricky to eradicate. They live on the underside of the leaves biting and tearing at the leaf tissue. You know you have a mite infestation when you notice weblike strands between the leaves. Regular misting helps keep the infestation under control but a strong solution of cayenne pepper or natural soap sprayed on the leaves has quite a remarkable non-degradation reaction. 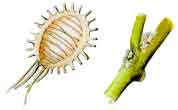 Mealy
bug - First sign of these pests is little white cotton wool blobs that
appear at the leaf joints and close to the stems and near the veins. These
are the homes for the mealy bugs whom when found in great numbers on a
young plant can severely damage it. Treat serious attacks with a spray
of malathion or dimethoate (a systemic insecticide) or by dabbing them
with a small paintbrush dipped in methaylated liquid. Mealy
bug - First sign of these pests is little white cotton wool blobs that
appear at the leaf joints and close to the stems and near the veins. These
are the homes for the mealy bugs whom when found in great numbers on a
young plant can severely damage it. Treat serious attacks with a spray
of malathion or dimethoate (a systemic insecticide) or by dabbing them
with a small paintbrush dipped in methaylated liquid. Scale
insect - Looking like small brown blisters that collect near the stems
and under the leaves in clusters. These scales act as an incubator for
eggs and can be eradicated by scraping off visible scales with a small
nail file and then spraying with a malathion or dimethoate solution every
10-14 days. Scale
insect - Looking like small brown blisters that collect near the stems
and under the leaves in clusters. These scales act as an incubator for
eggs and can be eradicated by scraping off visible scales with a small
nail file and then spraying with a malathion or dimethoate solution every
10-14 days. |
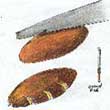
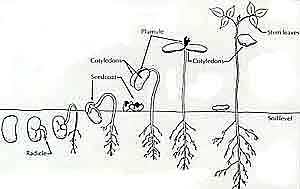 On
hard-shelled seeds, using a common small grained file, scarify outer edge
till you see the first fleshy inner. This is commonly referred to as the
Cotyledons. This first set of protective leaf matter covers the Plumule
and the Radicle (root section) which will eventually become the stem leaves.
Be careful not to damage the embryo. A Dremel tool is also quite effective
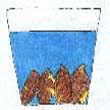
with a small bit. Once you have scarified the harder seeds, place in water
for about a day and a half. Depending on the seed size, soak for a longer
period. If you notice a puffiness of the seed then you know you have started
the seed out of its dormancy. In the case of the smaller fragile seed a
night in water would suffice. Some of the seed such as cashew nut may be
enormous compared to such as the virgin's breath and chime tree. Various
techniques from tissue wrap, to cotton swabs have been successful in growing
the smaller seed while harder, bigger seed need little coaxing.
On
hard-shelled seeds, using a common small grained file, scarify outer edge
till you see the first fleshy inner. This is commonly referred to as the
Cotyledons. This first set of protective leaf matter covers the Plumule
and the Radicle (root section) which will eventually become the stem leaves.
Be careful not to damage the embryo. A Dremel tool is also quite effective
with a small bit. Once you have scarified the harder seeds, place in water
for about a day and a half. Depending on the seed size, soak for a longer
period. If you notice a puffiness of the seed then you know you have started
the seed out of its dormancy. In the case of the smaller fragile seed a
night in water would suffice. Some of the seed such as cashew nut may be
enormous compared to such as the virgin's breath and chime tree. Various
techniques from tissue wrap, to cotton swabs have been successful in growing
the smaller seed while harder, bigger seed need little coaxing.