AMT 1:350 Klingon Bird of Prey
Revised Aug 2 2003

Pictures are a bit dark. Washes and weathering not easy to see

New picture shows the new guns better. Weathering still a bit hard to see as is the raised wings

Rear view of the BoP. Engine area painted with gun metal and Tamiya clear green to allow the LEDs installed to shine through
The underside of the model also shows the scratchbuilt guns. Raised wings a bit easier to see here. New stand made out of brass rod. Red painting on the underside was actually really easy to do. Mask the edges of the pattern and paint with a wide brush. Worked very well for me

Close up of the main body with the weathering
An excellent kit, impressive looking when done, very fun. Wings are not movable you have a choice of up or down, different radiator fins achieve this. Would be a lot of work to make them movable. Time I did not want to spend
Good Points
1. Fit of parts very good except for one part.
2. Engine and photon torpedo covers molded in clear so they can be lighted from behind (which I did)
3. Nice raised detail
Bad Points
1. Major seam line in front command section that is not easy to clean up. Unfortunately it is very obvious if not cleaned up.
2. Decals did not want to snuggle down
3. Weak looking stand supplied in kit
4. Wing choice of up (cruise mode) has them parallel not raised (as seen in the box art)
5. Underneath the model where the wing meets the body there is an obvious gap. Where there should be the bottom part of the baffles you can see into the model. Some sort of strip styrene can be used to close this up (Thanks to John for pointing this out)
Comments
1. Wings in the down position (Attack mode) looks very good although diagram in instructions make it look bad
2. Instructions for painting appear accurate
3. When assembling the kit make sure the checkered section separating the upper and lower hull is painted (grey) before putting this together. This will be very hard to paint afterwards
4. Another section that should be painted before assembly are the slots on the front and rear of the radiator fins
5. Raised detail on the wings make the red portions easy to brush paint. I thought I would have to mask and airbrush to get a good finish
Modifications by me
1. Washes and Dry brushing (rust) give the ship the dirty look as in the movies. This is what made the model really pop out.
2. Modified wing cannons to add more detail and to add the fiber optics
3. Added fiber optics and LEDs to Photon Torpedo, Engine, Wing cannons and a couple of other parts for variety.
4. Raised the wings to represent the box art. Took a bit of time to get both wings even
5. Added sheet styrene and PE parts to spruce up areas that seemed bare
6. New base for the fiber optics and wires

Aren't digital cameras great? Now I can take as many pictures as I want and try different things for my web page. Here are some more pictures of the BoP that may show the detail better than the previous pictures.

This picture was taken with the flash while the other one was taken with two halogen lights on. What it looks like in real life is between the two pictures. This one is a bit too right and the colours washed out while the first one is slightly dark.

Close up of the disrupters with the various scratch built parts labeled

Another view


Close up of the nose and the weathering added.

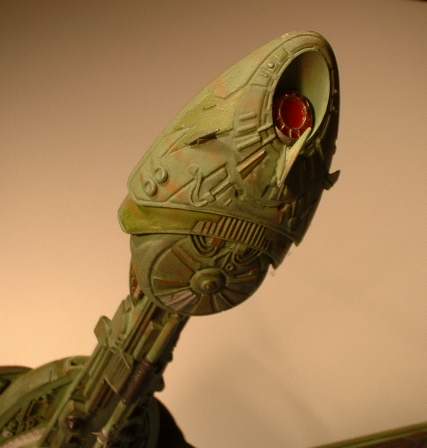
A close up of the neck area. Is this one nice kit or what?
Underside of the head. I added the little fins out of styrene to make it more menacing

Another shot of the underside to try and capture the excellent detail and the weathering

With flash this time

Overall show with flash

Close up of the engine area

Reverse view

Front underside of the body

Another front shot

One more for the road
Return to Home Page http://www.interlog.com/~ask
Send comments, suggestions etc. to ask@interlog.com